Web server: built-in or custom
Earlier in this guide, I mentioned that the watcher also lets you run a web server in the background, to serve the resulting files over HTTP. Some client-side technologies do need to be served over HTTP(S) instead of from a regular file. This also makes for shorter URLs…
There are two ways to run this server:
- Explicitly through the command line:
brunch watch --server,brunch watch -sor evenbrunch w -s(for that arcane feel); - Through the
serversettings inbrunch-config.coffee.
The built-in server is provided through an npm module named pushserve, and is therefore a bit more than a bare-bones static file server: it offers CORS headers, systematic routing of unknown paths to index.html to make pushState easier, and more.
If you want that server to always run when the watcher starts, you just need to add this to your configuration:
server:
  run: yes
If you want a different port than 3333, you can use the -P or --port CLI option, or the server.port setting.
Writing your custom server
This is great already, but sometimes you’ll need a few more features, if only for demo or training purposes… Let’s see how to write our own server, that would provide two REST API endpoints for us:
- A POST on
/itemswith atitlefield would add an entry; - A GET on
/itemswould obtain the list of entries.
We’ll keep it simple and use good ol’ Express, with the minimum set of modules we need to achieve this.
You let Brunch know about your custom server through the server.path setting, that will contain the path of your module. This module must export a startServer(…) function with the following signature:
startServer(port, path, callback)
When your server is up and ready (to serve, ha ha), it calls callback() so Brunch can resume its work. The server is automatically stopped when Brunch’s watcher terminates.
Here’s our example server. I could have written it in CoffeeScript, but in order to remain readable by everyone, I went with vanilla JS. I put this in a custom-server.js file.
'use strict';

var bodyParser = require('body-parser');
var express    = require('express');
var http       = require('http');
var logger     = require('morgan');
var Path       = require('path');

// Our server start function
exports.startServer = function startServer(port, path, callback) {
  var app = express();
  var server = http.createServer(app);

  // We’ll just store entries sent through REST in-memory here
  var items = [];

  // Basic middlewares: static files, logs, form fields
  app.use(express.static(Path.join(__dirname, path)));
  app.use(logger('dev'));
  app.use(bodyParser.urlencoded({ extended: true }));

  // GET `/items` -> JSON for the entries array
  app.get('/items', function(req, res) {
    res.json(items);
  });

  // POST `/items` -> Add an entry using the `title` field
  app.post('/items', function(req, res) {
    var item = (req.body.title || '').trim();
    if (!item) {
      return res.status(400).end('Nope!');
    }

    items.push(item);
    res.status(201).end('Created!');
  })

  // Listen on the right port, and notify Brunch once ready through `callback`.
  server.listen(port, callback);
};
For this to work, you must first add the necessary modules in your package.json:
$ npm install --save-dev express body-parser morgan
Then we’ll let our brunch-config.coffee know about it, and make the server auto-run in watch mode, too:
server:
  path: 'custom-server.js'
  run: yes
Let’s try watching:
$ brunch w
02 Mar 12:45:04 - info: application started on http://localhost:3333/
02 Mar 12:45:04 - info: compiled 3 files into 3 files, copied index.html in 269ms
Notice the custom server info in there. Try loading http://localhost:3333/ in your browser now: it works! In order to test this more thoroughly, let’s adjust our application.js to use the server’s API:
"use strict";

var count = 0;

var App = {
  items: ['Learn Brunch', 'Apply to my projects', '…', 'Profit!'],

  init: function init() {
    var tmpl = require('views/list');
    var html = tmpl({ items: App.items });
    $('body').append(html);

    $.each(App.items, function(i, item) { requestItem(item); });
  }
};

function requestItem(item) {
  $.ajax('/items', {
    type: 'post',
    data: { title: item },
    success: function(res) {
      console.log('Successfully posted entry “' + item + '”: ' + res);

      if (++count === App.items.length) {
        $.getJSON('/items', function(res) {
          console.log('Successfully fetched back entries:', res);
        });
      }
    }
  });
}

module.exports = App;
The watcher picks our update right up, and if we refresh the page and look at the console, we should see this:
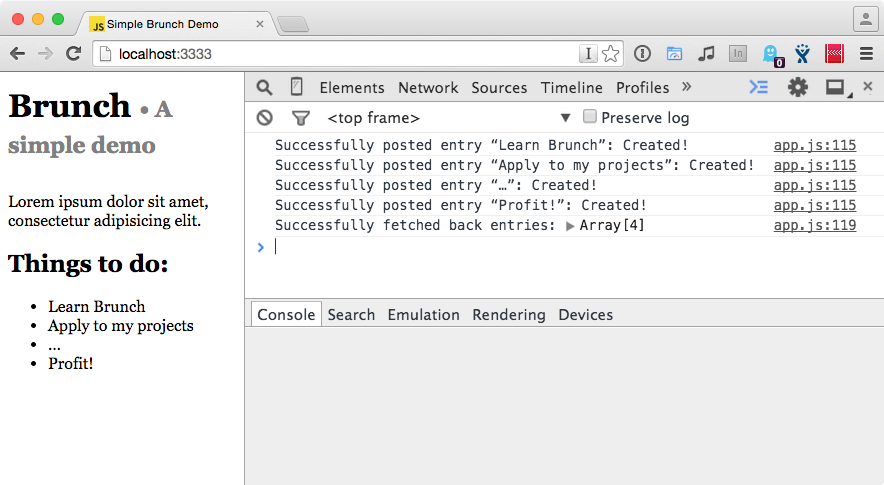
All good! (づ ̄ ³ ̄)づ
And not just Node, either…
A final setting you can use is server.command, which basically replaces all the other server settings: it lets you define a custom server-running command line, in case you want to write your own server using another tech, such as PHP, Ruby or Python… You could go something like this:
server:
  command: "php -S 0.0.0.0:3000 -t public"